Table of Contents
Turntable Setup
Position a turntable in the plan
- The track plan should be abstract, clear and functional in accordance with the "Golden Rules".
- The tracks should be positioned around the turntable in such a matter that the order and position of the layout are shown.
- Position all blocks with the minus side facing the turntable.
- Select the turntable symbol as large as necessary, but as small as possible.
- The symbol can be scaled in the grid in a size of 2x2 to 13x13. (Dialog Turntable: General).
The number of track exits displayed around the turntable varies accordingly.
Note:
With sizes 4 and 5 used on this page, up to 16 or 20 track exits can be displayed.
With the turntable max. possible 48 track exits require size 11 or 12.
Example plan with 8 shed tracks and 3 access tracks:
Optical adjustment of the track exits
- The turntable symbol has 48 possible track exits.
- Starting with track number 0 in the east, 12 in the north, 24 in the west and 36 in the south.
- The track number only determines the direction in which the track exits are displayed on the symbol.
- Tip: Just try changing the track number until the right direction to the outgoing track is found.
The track numbers are entered in this dialog Turntable: Tracks
Here are the track numbers matching the above picture:

Create all routes around the turntable
The Router does not create routes around the turntable, but there is a convenient function of the turntable object available:
- In the table Turntable: Tracks enter the corresponding track blocks.
- In the dialog Turntable: General activate the option "Manage track blocks".
- Rocrail then creates all relevant routes independently and temporarily at each restart.
- If individual settings in the routes are desired, it is advisable to engage in dialog Routes: General remove the option "automatically generated".
Thus the routes are generated and statically stored in the plan.
Routes can of course also be created manually.
After generating these routes assign the sensors -as usual- in this dialog Block: Routes.
For the integrated bridge block, the sensors are in dialog Turntable: Interface incorporated as sensor 1 - 4.
These sensors must also be created in the Table→Sensors.

Setting of Turntable arrive and depart sides
Manual
For the explicit arrival or departure on the plus or minus side of the bridge, must it turned matching to the track during operation. In Manual operation, this is done with Menu commands, routes or actions.
By default, the Plus side of the bridge rotates to the commanded Track number. If the Minus side of the bridge should turned to the track, the "Opposite Track number", defined in the "Tracks" tab, must be with Menu commands, routes or actions.
In schedules
Start with Rev 2.1.2418, no actions are required in schedules for the explicit arrival or departure on the Plus or Minus side of the bridge.
When entering the turntable as the a destination, it is only necessary to set the options "Arrive side" and "Depart side" required to "Both", "+" or "-" respectively.
It is recommended to leave the respective setting on "Both" and only change it in the Special cases described there. The Schedule automatic select and activate a suitable route.
Optional: external bridge block
The integrated block of the turntable can also be represented as an external Bridge block if desired.
The setup as an external Bridge block is necessary if, for example, the display of the block status colors, the locomotive/train identifiers or a more flexible assignment of sensors and events is desired than described here: Turntable : Interface.
Setup:
- It is an isolated block (without tracks) to be positioned in the plan.
It is recommended to use identical identifiers for the turntable and the Bridge block.1) - In the dialog Block: General should the Turntable ID be selected, so that Rocrail knows that it is a bridge block. 2)
- The type "Turntable" in the tab Block: Details should be activated. 3)
- After the aforementioned steps in the Turntable: General tab, deactivate the options "Manage Track Blocks" and, if still marked, also remove the option "Integrated Block". 4)

- The Sensor events of the internal Turntable block and the external Bridge block are processed differently. In order to avoid malfunctions, each individual sensor should therefore only either in the tab Turntable: Interface or in the tab Block: Routes of the external Bridge block be assigned.
- It is recommended to use only the feedbacks for the automatic enter and in events in the Turntable: Interface tab with the setup of the external bridge block to be assigned.
- All other Feedback assignments should be done in the Block: Routes tab of the external Bridge block.
For example:- enter and in if the here described automatic assignment is Not wanted.
- enter2in on a continuous Bridge track with a stop controlled by a timer.
- pre2in and shortin with Stop points defined in loco properties.
- Events timer.
- Sensors & events for specific routes.
- possibly further …
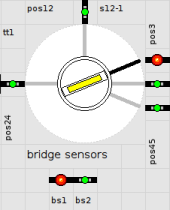
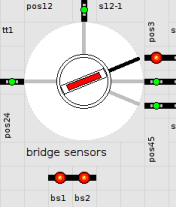
- The Color representation of the bridge (see half right) only occurs with the Bridge sensors 1 and 2 specified in the Turntable: Interface tab.
- The automatically assigned and generated enter and in events, as well as a pre2in generated with Bridge sensors 3 and 4 are also effective with the external Bridge block.
- If all feedbacks are assigned in the Block: Routes tab of the external Bridge block, only the color display in the block symbol takes place (see far right). The color of the bridge symbol then remains static green (unassigned).
The following figure shows an example of the arrangement of an external bridge block
Position sensors
Turntable decoders use one of the following options for the sensors of the turntable position:
- For "position reached" a central position sensor in dialog Turntable: Interface
- Each track exit a position sensor in dialog Turntable: Tracks
In this example, the bridge position sensors are left visible for clarity.
In the track plan of layouts you can with the option 'Show' set the sensor to invisible.
Bridge track-position sensor
For best results for positioning the locomotive, it is advisable to interrupt a bridge track and set up two sensors, as shown on the page Turntable.
If mechanical changes to the bridge are to be avoided, the enter2in sensor can be used instead with only one feedback.
It should be noted, that with the individual characteristics of each locomotive, accurate positioning on the bridge is more difficult.
Color representation of the bridge
The color of the bridge depends on the status of the bridge sensors as follows:
| color | Event |
|---|---|
| green | - |
| yellow | enter |
| red | in |
180°-rotation
The following example realizes a 180° rotation:
turntable-example.xml
Practical tips and further topics (in German)
5) These user pages cover further topics such as
- Turntable Signals
- Shed Doors
- Schedules
- Test- and Demoplan


